
By: Matt Teegarden
So we all have that one hipster friend (or acquaintance, whatever) who talks about their eccentric hobby(ies) with so much unguided pretension that our eyeballs are literally fatigued from rolling so much. Without fail, your exchanges always tend to breach the subject of how to best encourage spontaneous fermentation when making kombucha. As you desperately search for an excuse to exit the conversation, you might find your food-scientist-self thinking, “does this guy even know what he is talking about?” Maybe, maybe not.
Questionable-tasting fermented tea aside, one of the ~trendy~ hobbies that we all can likely get behind is home brewing. What your hipster friend may not know is that there is an impressive amount of high-quality academic research supporting the techniques, processes, and procedures that they use to make the beer you are sipping– as you half-listen to them tell you all about it.
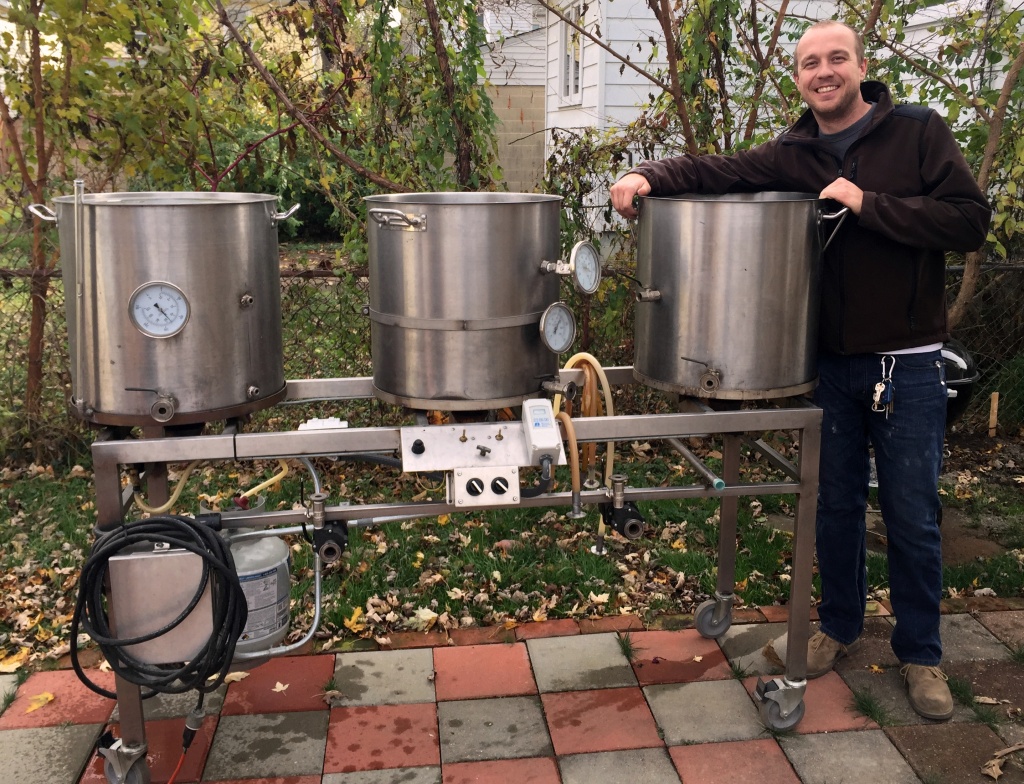
Lucky for me, my home brewing friend is not so much a hipster as he is a food scientist with a strong background in brewing. He enthusiastically agreed to help me out with this “Brewing 101” post dedicated to the basic science behind crafting of the perfect brew. What follows is what I learned one chilly Sunday afternoon as we brewed a few different beers. Meet David Phinney and his brewery. Yes, he built it himself.
No matter what your favorite type of beer is, they all start with the same thing: grains. The primary grains in beer are wheat and barley, mixed in various proportions. These grains are most often malted prior to use – meaning they have been allowed to start germinating and successively kilned. This process softens the grains and promotes the production of enzymes that will be essential later in the brewing process. Malting in itself is a science and an art just like brewing. Other grains, such as oats, can be added to comprise a minor amount of the grain profile as well. It all depends on the final sensory characteristics you are targeting.
The first thing we did was mill our grains. This process separates the hulls from the kernel and destroys the structural integrity of the grain, which will allow starch and amylase enzymes to interact once they are solubilized.
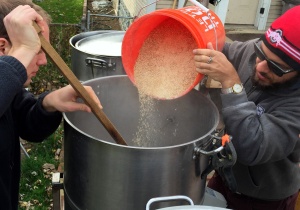
Mashing in
Next, we mashed in. Mashing in is the process by which you mix (seriously- there is a lot of mixing involved here) hot water and the milled grains together. If only it were that simple- you really have to hit the water/grain ratio just right because this proportion affects the pH, fluidity, and temperature of the mash.
Let’s talk biochem for a second. Enzymes function optimally at specific pH values and temperatures. What I really want to zero in on here is the temperature aspect. Let’s take 153 °F as a central temperature. Mash in lower than this, and β-amylase is favored, while higher temperatures favor α-amylase. How does this impact your final product? Well, β-amylase cleaves maltose moieties from amylose and amylopectin in an orderly fashion starting at their terminal ends. That creates a lot of fermentable sugar, which leads to a higher alcohol content but also a dry beer (less residual sugar). On the other hand, α-amylase eats away at amylose and amylopectin in a less precise manner, cleaving off larger oligosaccharide subunits. This provides a mouthfeel that counteracts the dryness imparted by β-amylase action. When we finished mashing in, we told Siri to set a 30 minute timer so that these amylase enzymes had time to work their magic. A lot of people traditionally mash for more than 30 minutes, but contrary to popular belief there is not much going on in there after half-an-hour.
After this resting period we were left with a nice solution of, essentially, sugar water which we isolated from the grain solids in a process known as lautering. To start lautering we first circulated our sugary water out the bottom of the mash tun and back into the top. This is the vorlauf if we want to get technical, and it allows the hulls from the grain to form a natural filter bed on top of a perforated plate in the bottom of the mash tun, which effects downstream clarification. As we lautered on, the mash was rinsed with clean, hot water and the sugar solution, really called “wort”-so appetizing- was pumped into a clean kettle. As we continued this sparging procedure, the sugar concentration in the wort was diluted quite a bit- as it should be. This is all accounted for in the next step: boiling.

Before (left) and after (right) vorlauf
Boiling serves a few purposes. The first, and perhaps the most obvious, is to sterilize the wort. You want the yeast you inoculate with to be the only thing growing as the wort is fermented. The second function has to do with hopping. Now, there is no beer I like less than a hoppy IPA, but these bittering agents are actually pretty cool-taste aside. Right when your almost-beer starts to boil you add a proportion of the formula’s hops. The heat promotes isomerization of alpha acids from the hops to iso-alpha acids. This change in carbon-carbon bonding is essential for preservation and bittering of the beer. The bitterness is necessary to counteract the sweetness imparted by residual dextran sugars post fermentation. More hops are added later in the boiling process to replace the flavor and aroma that was volatilized and lost from the initial addition.
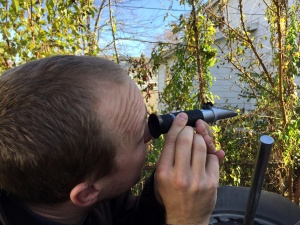
Phinney taking a brix measurement
Another purpose of boiling is to concentrate the sugars in the wort, which were diluted in the lautering process. Naturally, we took a soluble solids measurement before and after to gauge the total effect. This helped us estimate the final alcohol content of the beer as well. Less known is the fact that boiling drives off “undesirable” aroma compounds-only in quotations because some compounds like dimethyl sulfide (responsible for canned or cream corn aroma) may be the brewer’s goal.
After an hour of boiling, we turned off the heat, whirlpooled the wort, and let it rest. This pushed all the vegetal hop matter and coagulated proteins to the center of the kettle, which allowed us to avoid all the solid mass when we transferred the wort to a sterilized fermenter. As we transferred the boiled wort, we passed it through a parallel plate heat exchanger to cool it off.

Whirlpooling
Finally it was time to ferment! We added some brewer’s yeast, stored the fermenter in a room with decent temperature control and low light levels (Phinney’s dining room), and let the fermentation take off!
Overall, I will say this- brewing is a lot of standing around and waiting. You have to wait for your enzymes to process the amylose and amylopectin to sugars, you have to wait for your mix to boil, and then you finally have to wait for your beer to ferment and become, well, beer.
In the end, it is so worth it! During the day I was preparing for this post Phinney and I, along with our friends John and Casper, brewed 10 gallons of chocolate brown ale and 20 gallons of American wheat beer. I have yet to taste the fruits of our labors, but I have no doubt they will be supreme.
Cheers!
A big thanks to Phinney for his help in preparing this post.


I agree that the toughest part in brewing is the waiting, especially when it’s fermenting!
Love this! But when do you add in the chocolate and other flavors?
Great question! From what I understand the “chocolate” and other flavors come from the grain profile that you start with.
Thanks for such an interesting read! In agreement with Jay the toughest part of any home made product is waiting. Although this process has been simplified and explained thoroughly, I question whether this would be a viable option to make from home with all the relevant costs and time factors outweighing the benefits of the finished product. Do you think that producing one’s own beer is more beneficial than going for a store bought option and why? Also I am curious as to the most favoured beer flavours among consumers, which would you preferably make yourself? 15037755
Chocolate malt tends to only impart roasted flavors, although it is slightly chocolatey. Typically chocolate flavor is imparted with actual cocoa, cocoa nibs, or cocoa extract.
It can be used at the end of the boil, at primary, at secondary, or when packaging (bottle/keg).
It’s crucial to minimize the fat/oil. 100% cocoa is best, or make your own with a neutral alcohol and separate the fat that surfaces.
Phinney is a beer purist and as such we tend to not do flavored beers. But when we do (for pepper beer, for instance) we usually add them post-fermentation. A lot of people add flavoring components (spices, fruits, etc.) to the boil but we tend to do it post-boil so we don’t lose all the aromatic flavor compounds. The above comments are correct for this beer about the “chocolate” flavor, which does come from the grains in this particular brew.
Wow I had no idea the method to making beer was so complex. I am curious as to how long the beer has to ferment before it can be consumed. I also heard that if brewed incorrectly the product can be quite dangerous do drink?
15229272